There are a lot of apple dessert recipes online that claim to be easy and delicious and “light” at the same time and more often than not that is not the case. This recipe, however, is one of those that actually combines all those three elements. It will take you no more than 15 minutes to prepare and it is absolutely mouth watering even if you use just a couple of tablespoons of sugar and two tablespoons of butter (which makes it one of the least fattening desserts you can find).
Based on a recipe found on Bon Appetit this apple “pie” is perfect for every time you want some comfort food and an easy, yet delicious, treat for times when friends come over and you don’t really have too much time to prepare something.
*Note: I prefer not to quantify spices. Just add as much as you like. Spices depend on taste and preference. What I do is, I add the spices, as much as I think will be ok, then smell it and if it smells good for me, that’s how much I use. As a rule of thumb, I usually start with about 1 tsp of each spice.
What to do
Serves: 3
2 tablespoons unsalted butter
3 large apples
3 tablespoons dark brown sugar (you can use less if you want to, it doesn’t make that big of a difference)
2 tablespoons all-purpose flour
1 tablespoon vanilla extract
Ground cinnamon
Ginger
½ teaspoon salt
½ lemon
1 sheet frozen puff pastry, thawed
Some granulated sugar (for sprinkling)
How to do it
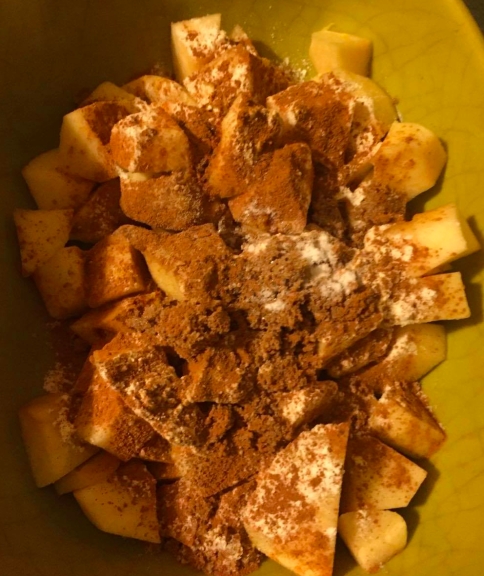
Preheat the oven to 230° C and brown the butter. Clean and cut the apples in small and larger pieces and place them in the pan you will bake them in. Add the sugar, flour, vanilla extract, cinnamon, ginger, salt, lemon (and some lemon zest) and some of the butter and mix everything together.
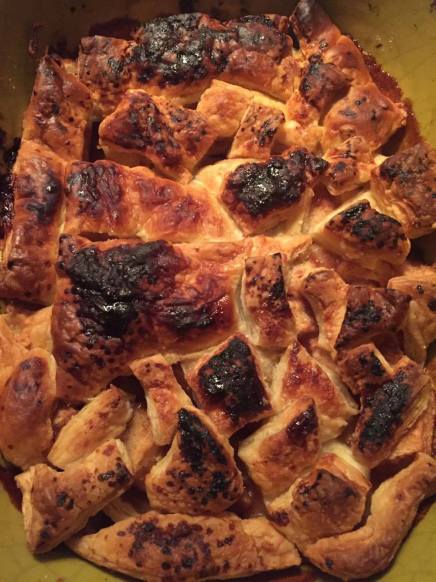
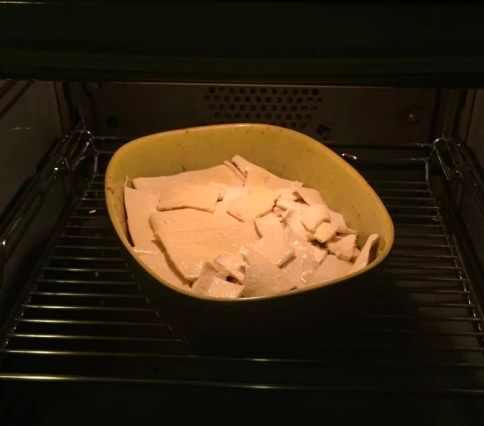
Cut the pastry in small and larger pieces and place it on top of the apples. Brush the pastry with the rest of the butter and sprinkle some sugar on top. Bake for 35 minutes. Then lower the temperature to 160° C and bake for another 30 minutes.
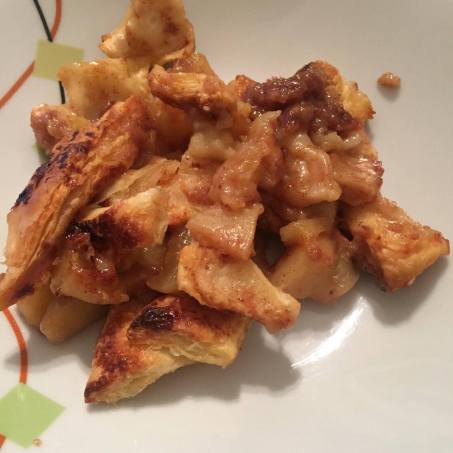
Take out of the oven and with the back of a spoon press some of the pieces in the apple juices (optional). Let it rest for a while and enjoy!
It’s a sunny mid March Sunday, you go out for a stroll, maybe some coffee and some hanging out in the sun, and when you get back home you find yourself desperately looking for something nice to eat. Preferably something that can be prepared in no time and taste like, well… a sunny springtime Sunday.
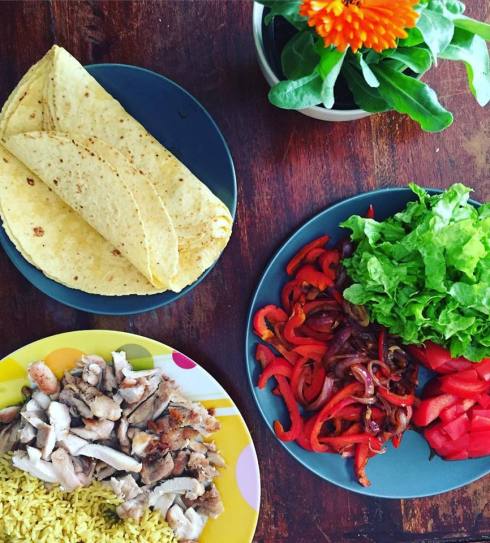
So, how about some fajitas? Jamaican spiced chicken and curry flavored brown rice (basmati rice is also great) fajitas to be exact. That’s what we thought and fortunately for us, we thought about it before we went out for that stroll, which was helpful because it meant that we took the chicken out of the freezer so that it would be ready to be cooked by the time we came back!
(But, you know… Having a microwave that is not broken like ours is something that can do the defrosting job if you don’t think about cooking chicken before you go out for a walk!).
So. All you need is some chicken (we used three chicken thighs), a cup of rice (we used brown rice), an onion, a red pepper, one tomato, a couple of lettuce leaves, a few tortillas and about 30-35 minutes.
Ingredients
3 chicken thighs
1 cup of brown rice
1 onion
1 red pepper
1 tomato
6 corn tortillas
3 lettuce leaves
Olive oil
Salt
Jamaican spice pepper
Curry powder
Yogurt (or sour cream)
Some grated cheese
Preparation
Pre heat the oven to 200 degrees.
Place an empty frying pan on high. While the pan is heating, season the chicken with salt and the Jamaican spice pepper. Sprinkle some olive oil on the chicken, lower the heat to medium and place the chicken in the pan.
Put a cup of brown rice in a small pan. Season with salt and some curry powder, add two cups of boiling water and let it cook for ten minutes.
Slice the onion and the red pepper, cut the tomato in small pieces and slice the lettuce.
When the chicken is cooked, remove it from the pan and let it rest. In that same pan add the onion and red pepper and cook to your liking (we cooked it for about 5 minutes, or until the veggies were soft).
Take a large piece of greaseproof paper, put it under the tab and get it all wet. Squeeze it so that most of the water goes off, wrap the tortillas in it and put them in the oven for 3-4 minutes.
Before you serve your fajitas, slice your chicken pieces so that then can be better used in your tortilla.
When everything is done and ready, place in individual plates and assemble your fajitas to your liking. We added some yogurt and some shredded mozzarella, but you can also use some mexican salsa, guacamole or just about anything.
I do not have a sweet tooth, but every now and then I get a craving for something decadent. When I do, I make sure it is not the most decadent thing in the world (diet!), but lacks nothing in taste – or appearance.
That’s the category strawberry and limoncello tiramisu falls under. It has the potential to be extremely beautiful and inviting, if you have the transparent glasses to put it in (which I didn’t) and is very tasty – with the refreshing taste of the strawberry sided with the kick of the limoncello and the sweetness and crunchiness of the ladyfingers.
We went to a friendly home last night and the strawberry and limoncello tiramisu was the best thing I could think of, to bring to the party. The sweetness and the freshness, the kick and the crunchiness, the harmonious combinations of all flavors and smells that come together in a glorious party of all senses, and the way it cleanses your mouth and your soul, well, it just feels like the perfect paragon of friendship.
This is even easy to make. It requires no baking (well… tiramisu!) but it does contain eggs, so make sure your eggs are of excellent quality and can be eaten raw.
Strawberry and limoncello tiramisu
Makes 4 individual glasses (about 200ml each)
Cream
250gr mascarpone cheese (if yours is a bit runny like mine was, use a bit more, but don’t overdo it)
a small espresso cup of limoncello (about 30ml)
30gr powdered sugar
3 egg yolks
Limoncello mixture
Zest and juice of one lemon (unwaxed, please, no one likes wax in their tiramisu)
6 TB limoncello
1 to 1- 1/2 TB sugar
About 5 TB water
Rest
250gr strawberries
30gr sugar
10 ladyfingers (or more, depending on the shape of your glass)
Preparation
First prepare the cream. Beat the egg yolks with the powdered sugar with a hand mixer until creamy. Add the limoncello and keep beating. Start to slowly add the mascarpone, a little at a time. At this point, you can either use the hand mixer or an eggbeater. I tried the hand mixer but was afraid it was beating it way too much, so I used the eggbeater instead. You know your mixture (and mixer) better.
If your mixture is runny, add a little more mascarpone. I had to add about 70-80gr more, because the mascarpone we bought was watery. Don’t add too much, though, the taste will change.
Put your cream in the fridge and let it cool. As it cools, it will also firm.
Now prepare the limoncello mixture. Add everything in a bowl and mix it together. Put that in the fridge as well. Easy, right?
🙂
Now chop the strawberries in small pieces, add the sugar and some lemon juice if you have any left from the lemon you squeezed for the limoncello mixture, and set it aside.
When you are ready to put everything together, take all of your bowls and plates, the ladyfingers, and start:
Cut one ladyfinger in half and immerse it in the limoncello mixture BRIEFLY. When I say “briefly” I literally mean for less than a second. Not figuratively, literally. It touches the liquid and out it goes. Then at the bottom of your glass.
Next comes a layer of cream.
Then a layer of strawberries.
Then another layer of cream.
Then take another ladyfinger, cut it in half and do exactly what you did with the first one. Put it over the cream layer.
Then add another cream layer.
Then add some decoration, maybe half a strawberry or a few strawberry pieces.
Your sweet indulgence is ready, for you and your friends to enjoy.
It’s Oscars night tonight and here at camp Chez Nous we are all very excited to once again celebrate that glorious fest that is this yearly ceremony.
We have The Booze, The Coffee, The Blankets and, naturally, The Food, that promises to get us through the small hours and keep us awake until Chris Rock says “Goodnight” and makes it yet again “legal” to yawn and fall asleep on the couch.
Of course, this year things will probably be different. My friend, A., my partner in Oscars-crime, lives hours away (by plane, mind you) and I have a class early in the morning, so it will be long before Chris Rock says “Goodnight” that it will actually be okay for me to shut my eyes and ZzzZZzzZZZzzZzZZzZZzz in front of the TV.
One thing won’t change: the food.
Since we will be catching the whole red carpet action before the actual awards (yasss!), I am sure to get The Guilt – you know, that feeling you get when Anne Hathaway looks gorgeous in a dress even your hanger doesn’t fit in, and you’re there, fingers yellow with Cheetos residue, mayo sandwiches and kreatopitakia winking at you from the end table, your pyjamas’ waistband leaving its mark on your skin.
So, this year we are going “light”.
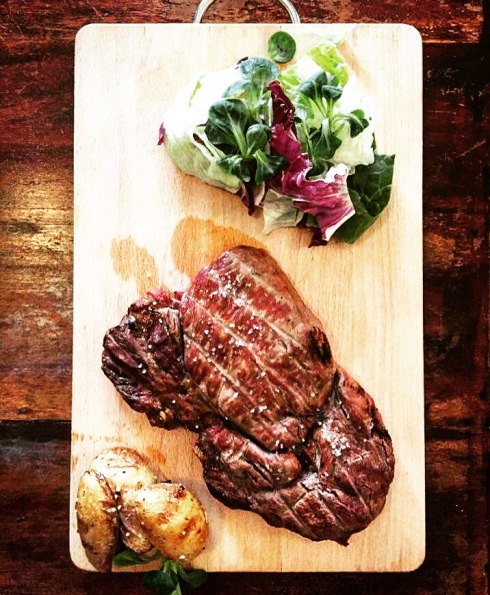
No Cheetos, no kreatopitakia, just some salad, oven roasted potatoes and a steak. Yes, a steak.
And Spritz, of course, because, yeah… eh… it helps me sleep!
That’s my story and I’m sticking with it.
So, this is what will be happening in our apartment, about an hour before the red carpet starts. You can do it along with us and share your results
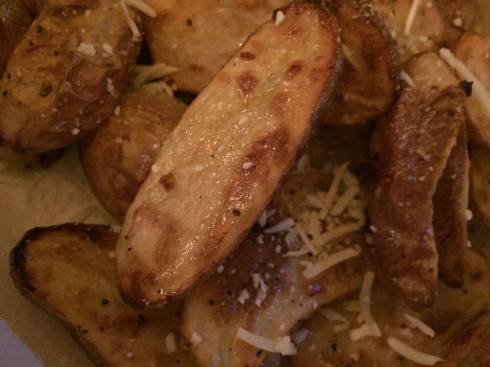
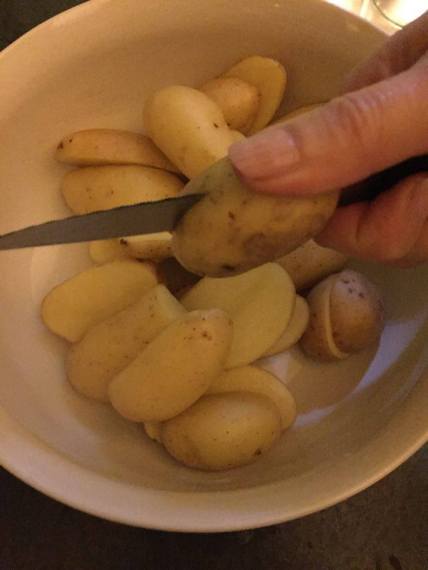
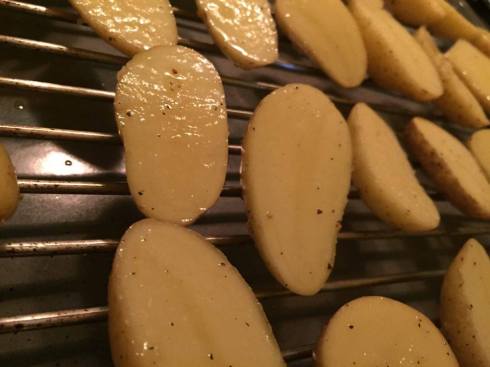
Oven Roasted Potatoes
About ½ kilo baby potatoes
2 garlic cloves
A few TBs olive oil (A few does not mean 20, it means about 4 – I may have used less)
Salt, pepper
Grated cheese (Parmiggiano is awesome, but, honestly, use the one you like best. Parmiggiano is the one I like best)
1 lemon
Preheat your oven at 200 degrees Celsius (400 Fahrenheit).
Make sure your potatoes are clean. I wash them, then scrub them, make sure there’s no dirt on them. That’s because we won’t peal them. If you peal baby potatoes, seriously, why? Why?
Cut them in half and put them in a bowl. You want to choose the bowl wisely, because you will be serving your potatoes in that bowl. Toss them with the oil, the garlic cloves, salt and pepper and make sure every little potato-half is covered with that nice, garlic-y goo.
Place them on a rack, cut side up and put them in the oven, on the upper third. Bake them for 25-30 minutes, depending on how big your potatoes are.
Do not wash the bowl, you’ll need it. I saw that part on Epicurious, that guy was a genius.
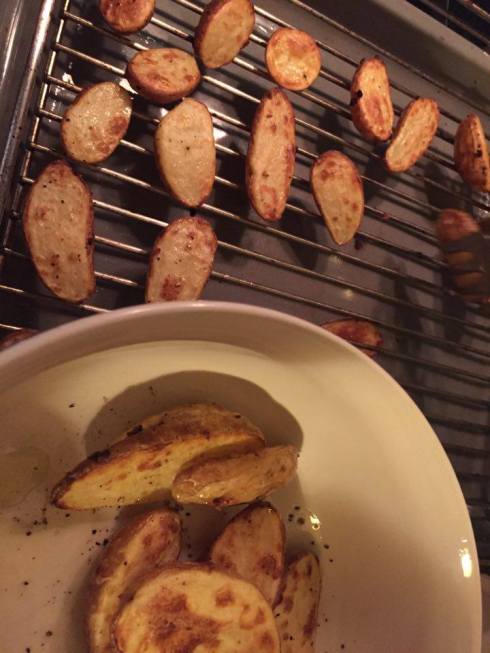
When they are nice and golden, take them out and place them back in the bowl. Toss them with the the cheese of your choice and put them back on the rack and back in the oven for another 10 minutes, or until your cheese is nice and melted.
Take them out, put them in the bowl and toss them in some lemon juice. Taste one for seasoning. Then steal another one before anyone sees you.
Serve.
If you want some extra heat, I suggest adding some red hot chili pepper along with the garlic and the oil, the salt and the pepper. Yum.
Steak
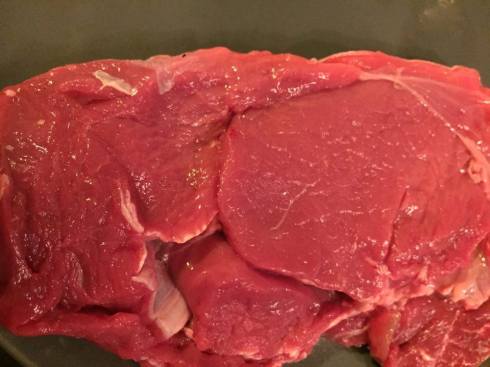
About 450-500gr beef steak
Rock salt
Some olive oil
Pepper (optional)
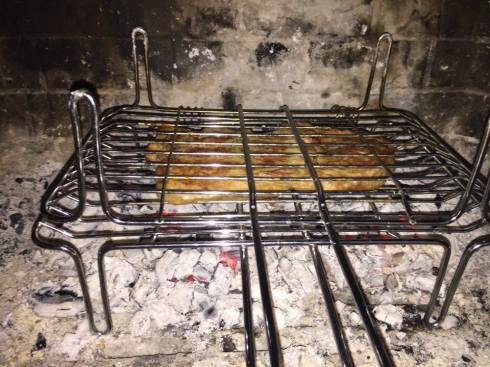
This is the easiest thing ever. Our goal was to do “Bistecca alla fiorentina”, which is a T-bone steak grilled over a wood or charcoal fire, seasoned with salt and a little bit of black pepper, and olive oil, applied immediately after you take the meat out of the heat. Unfortunately for us our butcher shop was out of T-bone steaks when we went there, so we had to settle for a no bone steak. But we made sure to get a pretty thick and large cut so that it would be as close as possible to the “real thing”!
So, no salt, no pepper, no nothing! Just place the meat on the grill and let the heat do its job. Cook the steak to your liking (5 minutes on each side did the job for us). Take the steak out of the fire, put it on a plate, season with some rock salt (you know, the one with the large sized grains, some black pepper and some olive oil and let it rest for a couple of minutes. That’s it!
Some like to add herbs, after the steak is done, so rosemary, thyme, maybe some garlic (don’t overdo it). The secret is to let the herbs accompany the taste, not cover it! It’s all about the meat!
Enjoy it with some beer. Or some wine. We’ll be having both!
So that will be our Oscars feast. Let me know what you think – or what you made!
It has been a while since I last cooked something for this blog, and I say this a lot, but in the past five years it seems like it’s always something, right?
Sometimes I let the bad things take control and sometimes I try to shake them off and start surviving. And those are the best times and I will try to make them happen more. Everything that’s happening is beyond my control, but I, me, myself, I am not beyond my control. Right?
Hopefully, at least 😉
Well, this past couple of weeks has had its ups and downs, politically, historically, Greece has come and gone, things in our lives have come in circles, losses, gains… We realized that we are experiencing a concentrated version of life, with its joys and disappointments, shocks and fears, losses and reliefs – and epiphanies like this require strong doses of food and celebration.
So I made samosas. We ate them watching football, drinking beer, spritz, with yoghurt, sausages, salad, cats, friends.
Then I made the video. Because, Foo Fighters. And cooking. Fooking. It makes me smile and laugh, not necessarily in that order.
A word about the food. Folding the samosas can be tricky. Watch the video, it makes the folding part pretty clear. Once you’re through with the folding, the filling is nothing. Also, feel free to use other spices you like. Garam masala will probably work miracles in this. Don’t omit the coriander, it smells exactly like i imagine a baby angel’s hair will smell like. Seriously. But, if you don’t like it, by all means. Add or leave out anything you want. And let me know what you changed and how it turned out.
Also, I don’t fry. So I baked them. But you can also fry them, and they will be crispier and, well, tastier. People who fry, know that. But these have fewer calories and are a bit healthier, so yay for that!
What you will need:
For the dough
3 cups flour
3 TB olive oil
½ TB thyme (dry)
½ tsp salt
less than a cup of cold water
For the filling
3 – 4 potatoes
some peas
1 onion
2-3 cloves of garlic
1 small carrot, grated
1 small chili pepper
1 tsp coriander seeds, broken
1 tsp cumin
½ tsp turmeric
1/3 tsp ginger
½ tsp sweet paprika
Some lemon juice
What you will need to do:
To make the dough, mix the flour, the oil, the thyme and the salt in a big bowl, add some of the water and mix with your hands, continuing to add water until you have a soft dough that doesn’t stick. Cover it with a towel (you can even touch it with some oil to keep it soft) and leave it to rest for about half an hour.
Meanwhile, boil the potatoes and, towards the end, add the peas.
When the potatoes and peas are done, heat some oil in a large pan and sauté your spices, until they are fragrant. At this point, you love me, because your house smells like heaven. Now, add the onion and cook until it is translucent and soft, about 2- 3 minutes. Add the potatoes and peas, the garlic, the carrot, the chili and cook for 4-5 minutes, until everything is brought together and smells like the spices. Take the potato mixture out of the pan, transfer it to a big bowl and add some lemon (as much as you want, don’t add too much, a couple of squeezes will do) and some pepper. Now take a fork and start mashing it, making sure you don’t end up with a pulp. Mash it but not too much, we want some pieces in it.
Let it cool.
Go back to your dough and take a bowl of water and a rolling pin with you. Take your dough, divide it in 8 equal balls, and start rolling them. Once you’ve rolled the first one pretty thin but not paper thin (you’re not making a pie!), cut the circle in half, take one half in your hand, dip your fingers in the water and wet the round edge, roll it and make a cone. This involves some hand crossing and some imagination, but you can check out the video and see how it is done. It’s pretty easy once you’ve seen it and made your first. BTW, the first two always suck, then it gets easier. Take your cone, fill it with your filling, dip your fingers in the water again, wet the remaining edge and close your samosa. Make sure you keep the shape.
At this point I separate myself from tradition and don’t even regret it. At this point you can fry your samosas in some non-fragrant oil and they become crispy and amazing.
But I don’t fry.
Ever.
Only if I absolutely have to, but I always try to find alternatives.
And alternative I did find.
So, at some point before starting to roll your dough, preheat your oven to 200C (400F). Once ready, place your samosas on an oiled baking sheet, brush them with some egg and put them in the oven for 30-40 minutes, depending on the oven, or until you see them turn golden and beautiful (whichever comes first).
Have them with some greek yoghurt (I suggest full fat or more!) or a chutney of your liking, and bon appetit!
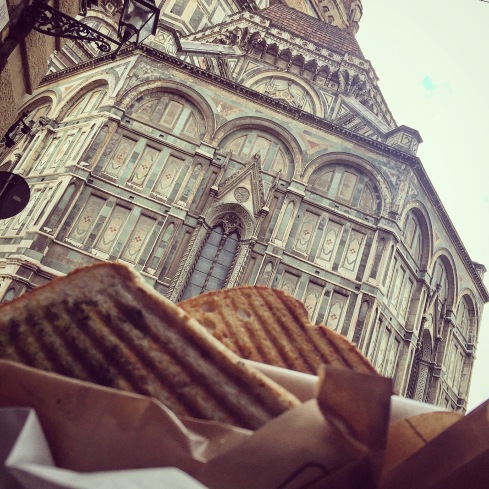
It’s been a while since I cooked anything and turned it into a video, mainly because, well, work. And things are so hectic in Greece right now that it just seemed like an insult to everything to be cooking and having a good time. And then… summer. Suddenly, in the middle of July, things just cooled off, the heat went up, and it was summer. I swear, it seems like it all happened in one day! So, we packed our bags and flew to what seems to be our new hometown by now – Florence (a.k.a. Firenze, you know, in italian). It’s very cheap to fly from Greece to Italy and Italy from Greece, so this back and forth has been fairly easy for us. This time it was just for a couple of days, but we shot enough short videos to actually edit one on a Foo Fighters song. Everlong was an obvious choice. So here it is. Our Florence. No museum insides this time – because we didn’t know if we were allowed! I hope you enjoy it.
It is Good Friday in Greece and, traditionally, yesterday was the day everyone made their tsourekia. Naturally I couldn’t resist, EVEN given the fact that the calorie count in tsourekia is off the charts. Quite frankly, they are worth each and every one of them. I never even count.
If I had to describe tsoureki (tsourekia in plural), with a gun to my head, I’d have to say that it’s a brioche-like bread, that’s had its flavor, not only enriched, but blown off the roof with the use of middle-eastern spices, like mahlab and cardamom, and mastic. It is breakfast, lunch, dinner, dessert, it can be eaten at any time, with your coffee, after lunch, FOR lunch, dinner, whenever you feel like it… Traditionally, you just keep eating until there’s no more to be eaten.
You can even fill it with chocolate, chestnut cream, white chocolate, marmalade, and when I was very little, I used to slice it, put mayo on it and a slice of ham and make myself a sweet-savory snack. Your imagination is the limit!
I made a version last year, but this is version 2, it is slightly different, and it tastes a little different too. I suggest you try them both, but I think I’ll go with this version next year, unless, of course, I discover a new one, which I will post immediately.
In Greece, tsoureki is the gift you give to your koumparous (the parents of your godchildren, that is, yup) or your in-laws, or, generally, your family, so I made several batches of these.
Here are a few things you should know:
Heat is your friend. Keep your utensils warm, especially if you’re using metal ones (plastic utensils don’t really get cold, do they?), you don’t want to “scare” your dough. Also, keep your house warm, so that they’ll rise faster. Mine rose in less than an hour and a half, the first batch just spilled over the pan. Of course they will rise no matter what, but why wait 3-4 hours? Just keep your place warm and it’ll happen.
DO NOT burn your yeast. You want the water you use for it to be warm, but not very hot, and the same goes for your flour mixture. If you burn your yeast, the dough will not rise.
DO NOT cook your eggs! You’ll add them in the butter-sugar mixture when it is not scorching hot, remember, you’re not making an omelet, you’re making tsoureki! Same with your milk, keep it warm, but not hot!
After you’ve added everything to your flour mixture, forget that flour exists. You will not add anymore, ever again. Not even for kneading. If you need something to work your dough with, that will be butter. Or oil, but please, opt for butter. If you put more flour in it, it will be yucky…
OF COURSE you can do all the kneading with the dough hook of your electric mixer. That’s how I made batch #2. Just start on low and gradually go higher, and beat for about 10 minutes. It’s cleaner, less messy and, frankly, less tiring. My mom did it by hand just to show you how it’s done, in case you have no electric mixer, OR wanted to know how it is traditionally done in Greece.
Oh yes, my mom is my guest star, every time I make tsourekia. Yup.
A word about cooling and storing them: Once they are out of the oven, leave them for a couple of hours, to cool. Once they are completely cool, turn them over, because you don’t want the moisture they leave on the parchment paper to soften the bottoms. Don’t do this too soon, because they will flatten, they forgive nothing! Yes, I’ve had it happen to me, yup. Once you see that the tops are nice and firm, flip them over and leave them for a while. Also, change the parchment paper, or remove it completely. You don’t want all that moisture around them, what good can it do? This whole time, cover them with a clean tea towel, no plates, now fancy covers above them, only a tea towel. Now, once they’re all nice and done and you’ve started eating (we started eating them long before they were nice and done, don’t feel guilty if you do it too), wrap them in plastic wrap. You’ll thank me. They will never get hard and stale if you do that. Well, “never”… you know…
If you haven’t eaten them in a couple of days, know that you can keep them in the fridge, for about 10 days, or in the freezer for… uh… a month? Even longer? I don’t know why you’d keep them for so long, but you know…
I’ll say this here, and pretend I’ve never said it: I wouldn’t put them in the fridge. They never last longer than three or four days, anyway, but if they did, I would just give them around, or soak them in milk and have them for breakfast, I would do anything but put them in the fridge. It’s a shame.
OK, let’s do this!
What you’ll need
For the yeast:
100 gr. fresh yeast
2 1/2 Tb sugar
80 ml warm water
For the dough:
1.1 kg hard flour
250 gr. butter
300 gr. sugar
350 ml warm milk
5 eggs (3 whole eggs and 2 yolks)
3 drops mastic
1 tsp ground cardamom
2 tsp ground mahlab
Zest of one orange
What you’ll need to do
First make your yeast: Crumble the yeast, add the sugar and the water, mix it around a little, cover it and leave it in a safe, warm place for about 10 minutes.
For the dough: First grind the mastic droplets with a little sugar (I did that in the food processor). Add the rest of the spices and cover. We don’t want that smell to escape!
Now, melt the butter with the sugar and let it cool a little. Beat the eggs and add the milk. Once the butter had cooled down a bit, add the egg mixture. Zest one orange in the flour and put the flour and the spices in a warm (not hot!!) pan or a huge – huge bowl, add the egg mixture, make sure it’s all not very hot and then add the yeast mixture. Start kneading. Knead, knead, knead and knead some more. You can always use an electric mixer, of course, in which case let the mixer do all the work and you can clean up your kitchen! 😉
Once you are satisfied with your dough, cover it up and leave it for a few hours, or until it has risen, about three times its initial mass.
Now butter your workstation, empty the dough and start to form your tsourekia. Remember to stretch and swirl, that’s how you’ll get the beautiful threads inside your tsoureki. Cut the dough in three equal pieces (or four, depending on how many you want to make) and cut each piece in three equal pieces. Weave them, always moving downwards. Secure the edges and place them on a baking sheet that you’ve covered with parchment paper. Preheat the oven at 160 degrees Celsius (about 315 Fahrenheit) and leave the tsourekia rise a bit more.
Now, beat an egg with a pinch of sugar and brush your tsourekia with the mixture. You won’t believe it, but you need to let them rest a bit more after that. Give them, say, five more minutes. Sprinkle some almond slices or some sesame over them if you want (I strongly suggest it, but some people don’t do it) and put them in the oven.
How long you’ll bake them depends on how big they’ve become. An average tsoureki takes about 40 minutes. Mine were really really big, so they took 50-55 minutes in total. You’ll see them: they have to be deep brown and a knife has to come out clean when you stick it in the middle of the tsoureki.
Once they are ready, take them out and cool them as I’ve mentioned above.
Try your tsoureki with anything, really anything. Most people have tsoureki with their coffee – strike that, everyone has tsoureki with their coffee, it’s the best. If you want to add more sweetness, just add nutella or marmalade, anything works really!
I do hope you enjoy them. My best wishes for a very happy Easter to everyone who’s celebrating with the Greeks, and a very happy everything for everyone else! May we all be healthy and do this again next year!
Continuing my Fooking spree (the things a person would do to avoid studying, right?) I made lemon cookies. Cookies, lemon, only 1/2 cup sugar, what else is there to say? Oh, yes, that we ate them in one day.
Seriously.
Just so you know, I don’t use a cookie cutter, because, you know… I don’t have one! I rolled the dough into a log and cut it with a knife. That way, my cookies (fookies) turned out (almost) round and normal!
They don’t take too long to make, they are pretty easy, the most time consuming thing (obviously) is the three hours the dough needs to rest in the fridge. But, you know, you can do all sorts of things in between!
So, here’s what you’ll need:
1 1/2 cups Flour
1/2 cup Sugar
1 Lemon
1/2 cup (1 stick) Butter
1/4 tsp. Baking powder
1/4 tsp. Baking Soda
1 egg
1 tsp. Vanilla
Some (a little) Salt
And what you’ll do:
Sift flour, baking powder, soda and salt in a bowl. Set it aside. Take the lemon, grate the zest and keep it, then squeeze it and keep the lemon juice. You’ll need 3-4 tablespoons of that, unless you really really love lemon, in which case, use as much as you want. Meanwhile, separate your egg and keep the egg-white covered and refrigerated – we will need it down the road.
In your mixer bowl, add the (softened) butter along with the zest and beat until it’s united. Then add the sugar, gradually, while beating, just until it is one. Add the egg yolk and half the flour and mix and beat until they are combined. Then add the lemon juice, the vanilla and the rest of the flour and beat until everything is combined. Do not overbeat, there’s no reason for you to do that.
Now for the fun part: Take your bowl and empty it on a flat surface. Take the dough and form a log. The diameter of the log should be a bit smaller than the size of the cookies you want to serve! Once you’re done, wrap it in plastic wrap and put it in the fridge for 3 hours.
Three hours later, preheat your oven to 190 degrees Celsius – 375 degrees Fahrenheit. Take your log, unwrap it and cut it in cookies. Line two baking sheets with parchment paper and place your cookies on that. Lightly beat the egg-white you saved in the fridge with a splash of water (a couple of tablespoons, no more), and brush your cookies with that mixture. Sprinkle with some sugar and place them in the oven.
You can place both baking sheets in the oven at the same time, just remember to switch places halfway through baking.
Now, you know your oven, each oven is different, so you will need to keep an eye on them. They can take from 8 to 15 or 16 minutes to bake. Take them out when they are golden around the edges. If you touch the center and it is soft, that’s ok. The cookies keep baking even after you’ve taken them out of the oven, they will go harder as they stand.
Let them stand in the baking sheets for about five minutes and then transfer them on wire racks, to cool. Or eat them warm, that’s what I did.
There’s also video evidence that I made them, which follows. I hope you enjoy them as much as we did.
Keeping up with my recent Fooking-mania (which is cooking with the Foos, that is with the Foo Fighters), I made one of Mr. S’s favorites yesterday: Chicken, rice and veggies, in the oven.
His mom usually makes this for us, but this past year she has been wildly unavailable for cooking (ugly unforeseen circumstances keep her away from her normal life), and, well, we missed it.
This dish is savory and heartwarming and juicy and all I want to eat on a cold Sunday, curled up in my blankets on my couch, watching football (sorry, soccer) and reading books. It is a bit time-consuming, but most good things are. Having said that, don’t think that you’ll be slaving in the kitchen all day long, it simply takes some time for the soup/broth to make and then 30 more minutes in the oven. And you’re done.
So, this is what you’ll have to have:
3 chicken breasts (now, that’s what I used, but you can use any part of the chicken you like. I hear legs are awesome, because they give it an extra whomp! So, why not?)
1+1 onions (you’ll need one whole onion for the broth and then a diced one for the oven)
2 bay leaves (or 3 if you’re a big bay fan)
2 cups of rice (use what you would normally use for chicken soup, but again, whatever you prefer is fine)
2 carrots
1 can of mushrooms (I used canned because it was Sunday, we were out of mushrooms, blah blah, you can use fresh if you want)
Salt and pepper (remember to season more than I season my food, I have a low salt sensor!)
Oregano (or any other herb you prefer, I am not a herb nazi!)
What you’ll need to do:
First prepare the broth (or the chicken soup, as we like to call it). Easy peasy, just throw your chicken, one onion and bay leaves in a pan, SEASON with salt and pepper, cover it with cold water by about 2 inches, wait for it to start boiling and when it starts lower the heat to medium and let it boil for 35-40 minutes. When your time is up, check to see if your chicken is done. If it is, take it out and save the broth/soup. You will not need the bay leaves or the onion (which has lost its taste by now).
Preheat your oven to 200 degrees Celsius (400 Fahrenheit). Chop your onion and carrots and throw them in a pan with some oil. Let them soften a bit, tossing them around and then add the mushrooms. Let the mushrooms take out their juices and, when they do, throw in the rice. Mix it all and cook for a few minutes, until everything has absorbed everything else’s taste. Don’t forget to season with salt and pepper. At this point you can also add some cayenne pepper or some cumin. It takes it to a whole other level.
When that’s done too, take a deep oven dish, put some oil in it and start assembling. First add the chicken and then the rice mixture around it. Make sure there are no empty spots in the dish. Now is the time for the broth. You need about 2 1/2 – 3 cups of broth for every cup of rice you have used, depending on your oven (the stronger the oven, the more liquid is evaporated). I used about 5 cups of broth for two cups of rice. Remember to measure your broth with the same cup you used to measure the rice. You WILL have a juicy dish in the end, not too juicy, but juicy enough, so don’t worry about it. Also, after a couple of hours, the juice magically disappears, I am convinced that faeries fly in and suck it with flower stems. Sadly, I have no proof.
So, once you’ve done this, put your food in the oven and bake for about 30 minutes or until the rice is done (it does take about 30 minutes!). Take it out, don’t let it stand for too long, it’s beautiful when it’s warm.
Enjoy it with some feta cheese, or some greek yogurt. Their coolness against the warmth of this dish is a very welcome contradiction!
Well… Now you know what we do when we want to heal our souls!
This blog focuses on current events, news stories and articles. You will also find theatre reviews, London life, vegetarian cooking, photography, scepticism and rants about Tony Blair